



Embedded terminal best practices: What to consider before deployment
09/09/2026
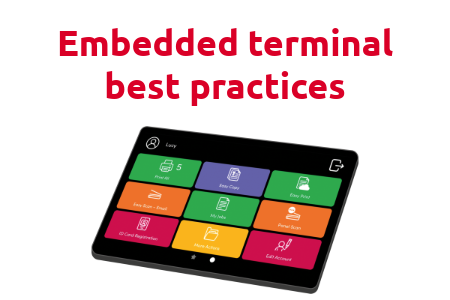
Instead of relying on external hardware, with MyQ solution users can authenticate, release print jobs, scan documents, and access personalized workflows directly from the printer’s touchscreen.
Resulting into a more intuitive user experience, simplified infrastructure, and stronger document security.
While the experience is designed to feel consistent across devices, deploying embedded terminals isn’t always identical from one manufacturer to another. Each vendor has its own platform, firmware requirements, and device capabilities, which is why installation and configuration remain common topics in our discussions alongwith conversations with partners and customers.
Whether you’re deploying a single device or rolling out embedded terminals across hundreds of printers, understanding these differences before installation can help avoid unnecessary delays and ensure a smoother deployment.
Why embedded terminals matter
An embedded terminal replaces the need for a separate hardware terminal by running directly on the multifunction device.
Once installed, users can authenticate using their preferred login method, securely release print jobs, access personalized workflows, and use advanced features such as scan-to-cloud services or accounting directly from the printer interface. MyQ X and MyQ Roger make sure that user experience remains the same while using embedded terminals from different brands.
Beyond improving the user experience, embedded terminals also simplify deployment by reducing additional hardware requirements while allowing organizations to deliver a consistent workflow across their print fleet.
Although the user experience is similar across supported manufacturers, the underlying implementation depends on each vendor’s embedded platform.
Start with the fundamentals
Regardless of the printer manufacturer, several preparation steps are common across most embedded terminal installations:
- Ensure the device is running a supported firmware version.
- Verify network communication between the printer and the MyQ server.
- Confirm that the required communication ports are available.
- Make sure the embedded terminal is licensed.
- Review the vendor-specific installation guide before deployment.
Remote installation can significantly simplify deployments, particularly in larger environments, but successful installation still depends on meeting the requirements for the specific device platform.
Not every manufacturer works the same way
One of the most common misconceptions is that embedded terminals are installed identically on every device.
Instead, manufacturers build their embedded platforms differently, which means certain prerequisites or deployment considerations vary between vendors.
Understanding these differences early helps reduce troubleshooting later.
Ricoh
The MyQ Ricoh SmartSDK embedded terminal is a software application on the Ricoh platform, running on an Android touchscreen display. Ricoh SmartSDK devices support remote installation through MyQ, making them well suited for larger deployments.
Before installation, administrators should ensure:
- The latest supported firmware is installed, and a valid license is activated on the MyQ server for the terminal.
- The MyQ Web Server port (443 by default) is allowed through the firewall.
- Java 8 Runtime Environment (JRE) is installed on the MyQ server, OpenJDK is strongly recommended; Oracle JRE versions above 8u341 aren't compatible with the Ricoh embedded installer, and installation of JavaSoft (Oracle) registry keys needs to be enabled manually since it isn't on by default.
- The correct server hostname or IP address is configured under MyQ, Settings, Network for remote deployment.
MyQ also recommends avoiding software-based restarts from the device's web interface, as they may not restart all components used by the embedded application. If remote installation fails, verifying firmware and Java compatibility is one of the first troubleshooting steps.
Kyocera
The MyQ Kyocera embedded terminal runs on Kyocera's HyPAS platform (Hybrid Platform For Advanced Solutions), exchanging data with MyQ over HTTPS. It can be installed remotely from the MyQ Web administrator interface or by uploading it directly to the device via USB
Note that the current 10.2 release doesn't yet include every 10.2 terminal feature. External Workflows are coming in a future release.
Before installation, administrators should ensure:
- The device is equipped with an SSD, HDD, or SD card, and has the latest firmware installed with a valid IP/hostname.
- .NET 4.7.2 or higher is installed on the MyQ Print server, and MyQ Print server 10.2 patch 10 or newer is running (for the 10.2 terminal).
- The correct time and date are set on the device, to avoid issues with scanning.
- Certificates use SHA-2, or newer SHA-1 certificates are no longer supported.
Several device-side settings also need to be changed manually on the Kyocera web UI before installing the terminal package on the MyQ server:
- Under Network Settings, Protocol, Other Protocols: set both Enhanced WSD and Enhanced WSD over SSL to ON.
- Under Security Settings, Network Security, Secure Protocol Settings: set Enhanced WSD Security to Secure Only (Enhanced WSD over SSL).
- Under Device Settings, System: set Default Display (HyPAS Application) to OFF, to prevent on-screen keypad issues.
- Under Function Settings: make sure the Job Name field is set to Job Name, not None or Off, since the wrong value can cause device errors.
Triumph-Adler and UTAX
Triumph-Adler and UTAX devices are Kyocera OEMs, so they run on the same MyQ Kyocera embedded terminal and follow the same installation prerequisites as Kyocera above (SSD/HDD/SD card, firmware, network, and security protocol checks). There's no separate terminal build to install for these brands.
Because device compatibility is confirmed per model rather than per brand, log into the MyQ Community Portal to check the certified devices list for your specific Triumph-Adler or UTAX model before deployment
Kyocera Embedded Lite
Separate from the full Kyocera embedded terminal above, Kyocera Embedded Lite is a lighter feature available on selected Kyocera devices, adding user authentication, pull print, and scan-to-folder/email directly on the device without the full terminal footprint.
Before installation, administrators should ensure:
- The Kyocera Provider service is running on the MyQ server (visible as KNM_PM in Windows Task Manager, and enabled via MyQ Easy Config), since the terminal depends on it to receive domain, user, job, and accounting data.
- The default Kyocera Provider ports (visible under MyQ, Settings, Network) are left unchanged unless there's a specific reason to alter them.
- The target device is on the supported printing devices list for Embedded Lite specifically, since it's a distinct compatibility list from the full Kyocera terminal.
Sharp
Unlike some other embedded platforms, the MyQ Sharp embedded terminal is web-based: no application runs directly on the device, no data is stored on it, and all files are kept in the MyQ directory, with the device exchanging data with MyQ over HTTP/S.
Note that the current 10.2 RTM release doesn't yet cover every terminal feature available on other platforms, only what's documented in the manual is supported, with more added in future releases.
Before installation, administrators should ensure:
- The device has a hard drive, and the required Sharp OSA option kits are installed on the MFP (MX-AMX2 or BP-AM10 is recommended, alongside an activated MX-AMX3 license).
- SNMP is active on the printing device, and the latest firmware is installed with a valid IP/hostname.
- .NET 4.7.2 or newer is installed on the MyQ Print server, and MyQ Print Server 10.2 is running (for the 10.2 terminal).
- The correct time and date are set on the device, to avoid issues.
It's also recommended to return the device's web UI settings to their defaults before installation, since custom settings changes can conflict with the terminal's functions.
Sharp Luna
Sharp Luna devices use a different embedded platform from standard Sharp devices, functionally closer to the Lexmark terminal (Java/Android-based) than to the web-based Sharp Embedded terminal above, so the two shouldn't be treated as interchangeable during planning.
Before installation, administrators should ensure:
- .NET 4.7.2 or newer (or .NET Core 2.1) is installed on the MyQ Print server.
- An administrator password is set on the device, and its IP/hostname is valid.
- The correct time and date are set on the device, to avoid Scan to Me issues.
- Remote installation is done via Printer Discovery with a configuration profile, and the server hostname/IP under MyQ, Settings, Network is confirmed correct beforehand.
HP
The MyQ HP embedded terminal is a web-based terminal: no application runs directly on the printing device, all files are stored in the MyQ directory, and the device exchanges data with MyQ over HTTPS.
Before installation, administrators should ensure:
- The device is running HP FutureSmart 4.10 or newer, since MyQ HP Embedded terminal 10.2 requires it.
- .NET 4.7.2 or higher is installed on the MyQ Print server, and MyQ Print server 10.2 patch 8 or newer is running (for the 10.2 terminal).
- An administrator password is set on the printing device, and its IP/hostname is valid — the MyQ server also needs to be reachable on the network via network names, not just IP.
- The correct time and date are set on the device, to avoid issues.
Remote installation via Printer Discovery is the recommended method, especially for larger rollouts
Before installing, confirm the server hostname/IP address under MyQ, Settings, Network is correct, since a mismatch (common after a license update or upgrade) will cause remote setup to fail.
Lexmark
The MyQ Lexmark embedded terminal is a software application on the Lexmark platform, running on an Android touchscreen display, not the web-based architecture used by some other brands. It's installed remotely via the printing device's web UI and can communicate with multiple types of USB card readers.
Before installation, administrators should ensure:
- .NET 4.7.2 or newer (or .NET Core 2.1) is installed on the MyQ Print server, and MyQ Print server 10.1 or newer is running (for the 10.1 terminal).
- An administrator password is set on the printing device, and its IP/hostname is valid.
- The correct time and date are set on the device, to avoid issues with Scan to Me.
- The server hostname/IP address under MyQ, Settings, Network is correct, since a mismatch (common after a license update or upgrade) will cause remote setup to fail.
Remote installation is done via Printer Discovery with a configuration profile attached, which is the recommended method for larger rollouts. If unexpected problems come up during installation, a factory reset followed by repeating the process is the recommended first troubleshooting step.
Toshiba
The MyQ Toshiba embedded terminal (SDK 3.x/4.x) is also web-based, communicating with the MyQ server over HTTP/HTTPS using XML.
Before installation, administrators should ensure:
- The latest firmware is installed and the device's IP or hostname is valid.
- The device is reset to its factory default state beforehand, to rule out conflicting settings, and the correct time and date are set afterward.
- The device is started in Service Mode so the required Toshiba system settings (e.g., authentication of the MDS system, WS port for scanning) can be enabled before remote installation.
- The MyQ Toshiba Terminals Windows service (installed automatically with the terminal package) is running, since the embedded terminal can't communicate with the server without it.
Xerox
The MyQ Xerox embedded terminal is a web-based terminal supporting Xerox EIP 3.7, 4.0, and 5.1+ (older EIP 3.5 and below aren't supported). Note that the current 10.2 RTM release doesn't yet cover every terminal feature available on other platforms; only what's documented in the manual is supported, with more added in future releases.
Before installation, administrators should ensure:
- .NET 8 or newer is installed on the MyQ Print server, and the server has a fully qualified domain name.
- The latest firmware is installed and the device is reset to factory defaults beforehand, with the printing device and server set to the same time and timezone afterward.
- SNMP is configured with matching values on both the MyQ server and the device web UI (SNMPv3 is recommended; the SNMP menu location on the device differs between EIP 3.7 and EIP 4.0/5.1).
- A certificate is set up via either the server's Built-in Certificate Authority (default, no changes needed) or Manual Certificate Management with a matching certificate uploaded to the device.
Worth flagging separately: on AltaLink machines, the first login after remote setup or a restart can land in the device's native menu instead of MyQ subsequent logins go to the MyQ Top Menu correctly.
Canon
The MyQ Canon embedded terminal runs on Canon's MEAP (Multifunctional Embedded Application Platform) 5.0+ and is installed manually via the device's web UI rather than fully remotely. Installation packages are region-locked (separate EMEA, US, and Asia packages), so make sure you're using the package for the correct region before deploying.
Before installation, administrators should ensure:
- The device has an installed HDD and the latest available firmware for its model.
- Microsoft .NET Runtime 6.0 (Hosting Bundle) is installed on the MyQ Print server.
- The device's login screen and ACCESS MANAGEMENT SYSTEM settings are configured in Settings/Registration before the terminal package is installed.
- A MyQ License Access Number is used to generate the device-specific license file via Canon's licensing portal before installation.
It is worth noting that Canon devices ignore the idle-logout time set in the MyQ configuration profile, it has to be set separately on the device itself, under Settings/Registration, Time/Energy Settings, Power Save Settings, Auto Reset Time.
Epson
The MyQ Epson embedded terminal is a web-based application built on the Epson Open Platform (1.0/1.1), exchanging data with MyQ over HTTPS. Note that the current 10.2 RTM release doesn't yet cover every terminal feature available on other platforms; only what's documented in the manual is supported, with more added in future releases.
Before installation, administrators should ensure:
- Epson Open Platform is enabled on the device's web UI, using a product key obtained by registering the device with Epson support.
- The server hostname/IP address under MyQ, Settings, Network is correct before starting remote installation.
- The scan file format on the device isn't set to Compact PDF by default, since this is known to cause the terminal package installation to fail.
Fujifilm
The MyQ Fujifilm embedded terminal is a web-based application. Note that the current release doesn't yet cover every terminal feature available on other platforms, only what's documented in the manual is supported, with more added in future releases.
Before installation, administrators should ensure:
- MyQ Print Server 10.2 patch 10 or newer is installed (latest patch recommended).
- The device's motion sensor is disabled beforehand, since it can interrupt setup.
- The device is put into sleep mode and its Automatic Document Feeder (ADF) is empty before installation.
- Any previous BETA/RC version of the terminal is fully uninstalled first if upgrading to the RTM release.
Katun
The MyQ Katun embedded terminal shares the same web-based platform and installation prerequisites as the Fujifilm terminal above (Katun devices are OEM units on comparable hardware), so treat the same checklist as a starting point and confirm against Katun's own supported devices list.
Before installation, administrators should ensure:
- MyQ Print Server 10.2 patch 10 or newer is installed (latest patch recommended).
- The device's motion sensor is disabled and the device is put into sleep mode beforehand, with the ADF empty.
- Any previous BETA/RC version is fully uninstalled before installing the RTM release.
Brother
The MyQ Brother embedded terminal runs on Brother's BSI platform and uses Brother's native UI, so some features are limited or adjusted compared to other platforms (for example, Direct Print isn't supported, and jobs are accounted only once the user session ends).
Before installation, administrators should ensure:
- The device supports BSI, is on the supported devices list, and has BSI enabled.
- MyQ Print server 10.2 patch 15 or newer is installed (the latest version is recommended).
- The correct date, time, and time zone are set on the device, since these aren't configured automatically during remote setup.
- Manual installation (configuring Login, Logout, and Menu entries plus the CA certificate directly on the device web UI) is currently the primary supported method; remote installation via Printer Discovery is available but still in beta, so manual installation is the safer fallback if issues come up.
MyQ Roger
MyQ Roger's embedded terminal support currently covers a narrower set of brands than MyQ X: HP, Kyocera, and Ricoh. As with MyQ X, each brand has its own setup steps and platform requirements:
- HP (HP Workpath): Before installation, sync the device's date/time to an NTP server, confirm HP Web Services is enabled, and enable either the HP Workpath platform or the JetAdvantage Link platform (depending on the device model) so the device can be registered and verified in the HP Command Center before the MyQ Roger app is installed.
- Kyocera: Before installation, confirm the MFD is on the supported devices list, runs Kyocera with Java 1.8, has a display of at least 800x480 with a WebKit browser, supports the Device Spool feature, and has SSD/HDD storage available (some models need custom firmware to support SSD). Note that Offline Login isn't available on this current terminal (version 26+) only on Kyocera classic below.
- Kyocera classic: A separate, longer-standing terminal (version 24.1) aimed at older or more diverse Kyocera fleets that aren't on the supported list for the current terminal above. Before installation, confirm the MFD is on Kyocera classic's own supported devices list, uses Kyocera TLS 1.2 or newer, has a display of 7 inches or larger, supports the Device Spool feature, and has SSD/HDD storage available.
- Ricoh: Before installation, confirm the device model is on Roger's supported devices list, and configure SMTP/scanning options and the automatic user logout timer on the device beforehand if scan-to-me, scan-to-email, or Panel Scan will be used.
Plan large deployments carefully
As organizations expand from a handful of printers to dozens or even hundreds of devices, consistency becomes increasingly important.
Remote installation through Printer Discovery can significantly simplify deployment by allowing administrators to install embedded terminals across multiple devices from a central location. Configuration profiles can also be applied during discovery, helping standardize device settings throughout the environment.
Before beginning a large rollout, it’s good practice to:
- Validate the deployment on a small number of representative devices.
- Confirm firmware consistency across the fleet.
- Standardize configuration profiles wherever possible.
- Verify network communication before beginning mass deployment.
- Review vendor-specific requirements for each printer family.
Taking these steps early can reduce the need for manual troubleshooting during deployment.
When installation doesn’t go as planned, many support requests stem from a relatively small number of recurring issues.
These often include:
- Unsupported or outdated firmware.
- Missing hardware requirements on specific printer models.
- Incorrect server hostname or network configuration.
MyQ X adds embedded terminal support for Sharp’s newest range of A4 multifunctional printer (MFP) models, optimizing productivity and document management for modern offices.
MyQ X
3 min read
Meet the upgraded MyQ X embedded terminal 8.2 for Ricoh multifunction print devices (MFPs). This version significantly improves job accounting, expands job property options, and introduces new features, all while preserving the functions customers are accustomed to.
MyQ X
3 min read
The HP LaserJet Managed E800/E700 series comes in colors! In addition to getting the latest technology inside, buyers can also decide on the color of the front panels.
MyQ X
3 min read